Things You Need To Know About Yoga Squat: Benefits, Instructions, Tips & Common Mistakes
Yoga squat also referred to as the Malasana, is a fantastic yoga pose that is both strengthening and opening. Even though the pose may appear simple, we can assure you that it requires patience and practice to achieve the ideal position.
The yogi squat has been practiced for centuries, and if you’ve ever taken a yoga class, you’ve probably tried it at least once. The yogi squat is fantastic for a number of body parts and, when practiced regularly, can really help your body feel better and healthier.
Table of Contents
What is a Yoga Squat?
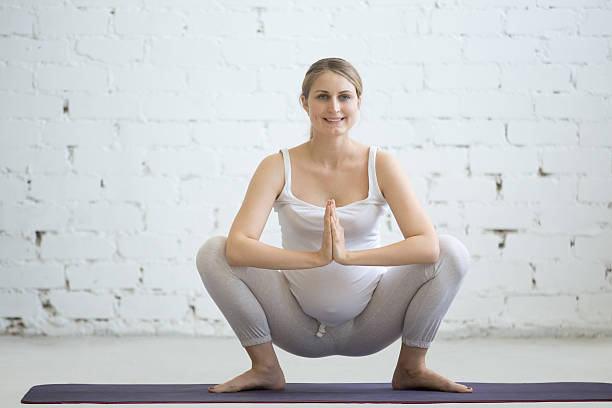
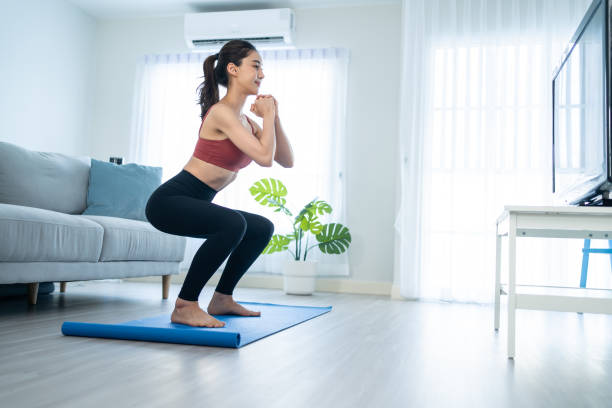
As one of the best hip openers Garland Pose or “yogi squat” is like the deeper, more flexible cousin of a conventional squat. A yoga squat continues to descend until your tailbone is just above the floor, rather than stopping when your knees and hips are 90 degrees from each other. Your hips will be lowered by your ankles in a full yoga squat, and your hip flexors will be deeply stretched. With your elbows, you gently push your knees apart for a deeper hip opening while placing your hands in the prayer position at your heart’s center.
Benefits of the Yogi Squat
Healthy Digestion
The yogi squat, which is centered in the belly area, has an impact on your lower abdomen. Stretching in this position on a regular basis can help your digestive system clear out waste materials and release trapped gases in your intestines.
Strengthens the Lower Body
Your legs are working and stretching simultaneously because you are in a low squat position. But in addition to your thighs, your ankles, shins, and calf muscles are also engaged. Your core is also working to maintain your balance, which gets stronger with repetition and consistency.
Relief During Pregnancy
In all three trimesters of pregnancy, this pose is a great one to practice. A 2015 study, according to Livestrong, found that 25 other poses, including Malasana, are effective for lowering stress, depression, and anxiety during pregnancy. Additionally, it has no negative effects on either the mother or the fetus, making it completely safe to practice, especially when using an all-natural cork yoga mat.
Better Posture
The yogi squat is a fantastic posture-enhancing exercise. When performing the pose properly, your posture is automatically corrected because the goal of the pose is to align your hips evenly and bring your spine into a straight position. Particularly if you spend all day at a desk, this pose can be very helpful for improving your posture. Your back and spine will feel a lot better.
Boosts Metabolism
By supporting the endocrine glands, Malasana can help increase metabolism. The endocrine glands are rubbed and put under pressure in this position, which stimulates your metabolism and improves the function of your digestive system.
Relieves Back Pain
Back pain is a given if you spend the entire day sitting at a computer. The yogi squat is a great exercise to get rid of back pain and stop it from coming back. It can work quickly to get your back feeling as good as new because it realigns your spine and releases pressure from your lower back.
Grounds and Incites Calmness
While some yoga postures are meant to be energizing and uplifting, others are meant to be rooted, soothing, and calming. The latter is the case with this pose. You will experience stress relief and calmness from its strong sense of grounding.
Step-By-Step Instructions
Make sure you can get into this pose with the correct alignment if you want to reap all the benefits. After a series of muscle-warming Sun Salutations or at the conclusion of a hip-opening yoga class, this beginner’s rendition of Malasana can be practiced.
- Start in mountain pose with your feet slightly wider than hip distance apart. Do not arch your lower back or stick out your butt; instead, make sure your spine is straight and your pelvis is tucked in.
- Activate your glutes and point your toes diagonally outward.
- Reach your arms overhead and take a deep breath. Start bending over toward the mat as you exhale.
- Keep your heels on the ground and your feet flat. To squat deeper between your knees, widen your stance if your heels lift.
- Breathe normally as you slowly squat as deeply as you can. Having trouble fully squatting is acceptable.
- To open your hips and groin, bring your palms together at the center of your chest and spread your knees widely.
- When you want to intensify the stretch, hold the posture while taking deep breaths and lightly tucking your elbows into your knees.
- To get out, just take a deep breath, contract your glutes, and push off your feet to stand up again.
Tips for Mastering the Pose
Use Your Elbows
The elbows are a key tool for stabilizing this pose, regardless of how far you’re lowered to the floor or how high your hips are above your knees. As your palms push together for leverage, your elbows should be pressed into your thighs or inner knees. To continuously extend your knees (avoid overextending them), apply a slight resistance.
Keep Your Spine Straight
Malasana is only helpful for posture if your back is straight. Your whole spine can lengthen upward as the butt reaches down toward the floor. Imagine a stick with two opposing ends that extend straight from the top of your head to the base of your tailbone.
Engage Your Core Muscles
Flexing your abdominal muscles will help you maintain a straight spine and protect your low back, just like most yoga poses do.
Be careful not to force your knees to splay out at an uncomfortable angle if you have knee injuries or discomfort. Avoid going any deeper once you feel pressure on the knees. Until the pressure is relieved, try to widen your foot position.
Push on the Outside Edges of Your Feet
The main stabilizers in this pose are the outsides of each foot. The heels, big toe, pinky toe, and edges should be rooted to the ground.
Common Mistakes
Rounded Back
While it’s normal to want to curve forward as you try to find your center, the Yogi Squat is meant to be done with your spine perfectly aligned. Your lumbar spine, or lower back, can be especially harmed by having a rounded back. Raise your elbows so they are more in contact with your thighs in order to correct it by pressing your hands together in a prayer position. After that, exert pressure on the inner leg. Allow your pelvic floor to open up and your tailbone to fall straight to the mat. Use a block or modification from below if necessary. Your body should be in a straight line with your core engaged.
Heels Lifting Up
You are probably standing on your toes too much and falling forward if the heels lift off the ground. Add a yoga wedge or yoga towel underneath for support to fix it.
Feet Not Splayed
In order to mimic a standard squat, beginners frequently keep their feet facing forward. As an alternative, visualize your toes extending diagonally to the room’s corners. This will guarantee that your knees are externally rotated, allowing you to kneel comfortably between them.
MODIFICATIONS & VARIATIONS for YOGI SQUAT
The correct way to perform the pose has already been discussed, but in this section, we’ll look at some modifications that can be made to make the pose simpler as well as some additional variations, such as moving into the full variation.
Yogi Squat Modifications for Beginners
Practice reaching forward in front of a wall or piece of furniture if you struggle with balance. This will assist you in maintaining balance while you fully practice the yogi squat until you are able to practice without additional support.
Before squatting down, place a towel that has been folded behind your knees if you’re feeling any pressure. Any pressure will be released, and it will become more comfortable.
Try only squatting halfway if you are unable to lower yourself all the way with your heels on the ground. Yes, you will work your legs harder, but with practice, it will get easier.
Yogi Squat Variations
Keeping your feet and legs together while squatting can be more difficult. Because it is more challenging to balance, this pose is much more challenging but is also excellent for strengthening the lower body.
With your hands clasped by your right hip and your left arm around your back, you can give yourself a slight spinal twist by wrapping your right arm around the front of your right (bent) leg. Repeat on the other side after switching sides.
You must enter the variation we listed above in order to perform Malasana in its entirety. Then, extend your arms forward (in between your legs) and place your palms firmly on the floor. Leaning forward and bending your body toward the ground, start to lean between your legs. Your forehead will eventually rest on the ground, where it will stay for a while. Although it will take some practice to master this variation, the rewards are priceless.
Safety and Precautions
The pose known as Malasana is generally considered to be safe and requires few safety measures. You should be able to perform this pose at home as long as you practice while keeping your boundaries in mind. Yoga practitioners who are expecting or who already have injuries should only attempt this pose with the assistance of a certified yoga instructor. Remember:
- Don’t go past your range of motion by sinking too far. Use a block or maintain your hips in the air.
- Don’t put your entire weight on one foot. Through your heels and toes, it ought to be dispersed.
- Because of the pressure on the ankles and calves, runners and other athletes shouldn’t perform this pose right away after challenging cardio workouts.
Final Thought: Practice Regularly
A popular pose that has been used for centuries is the yogi squat, also known as Malasana. Many people will actually hang out in this position even in public if you travel to countries like Indonesia or India. People from Western cultures might find this strange, but it is completely normal and has been for a very long time. It is a healthy way to sit and is great for the lower body and spine.
The yogi squat should be practiced regularly, whether in your yoga practice or just while relaxing at home if you want to improve your digestion, posture, lower body tone, and practice depth. You’ll feel much better and have more flexibility as well as a grateful back.

